


Thinking about building your own cabinets? Wondering how to use pocket door hardware on cabinets? If so, then this tutorial is for you! I’m breaking down all the steps to building a DIY cabinet with pocket doors.
Jump To:
Building Lower Cabinets
Building Upper Cabinets
Adding Pocket Door Hardware
Building the Face Frame
Adding Shelves
Making Cabinet Fronts
Applying Stain
Adding Glass Inserts
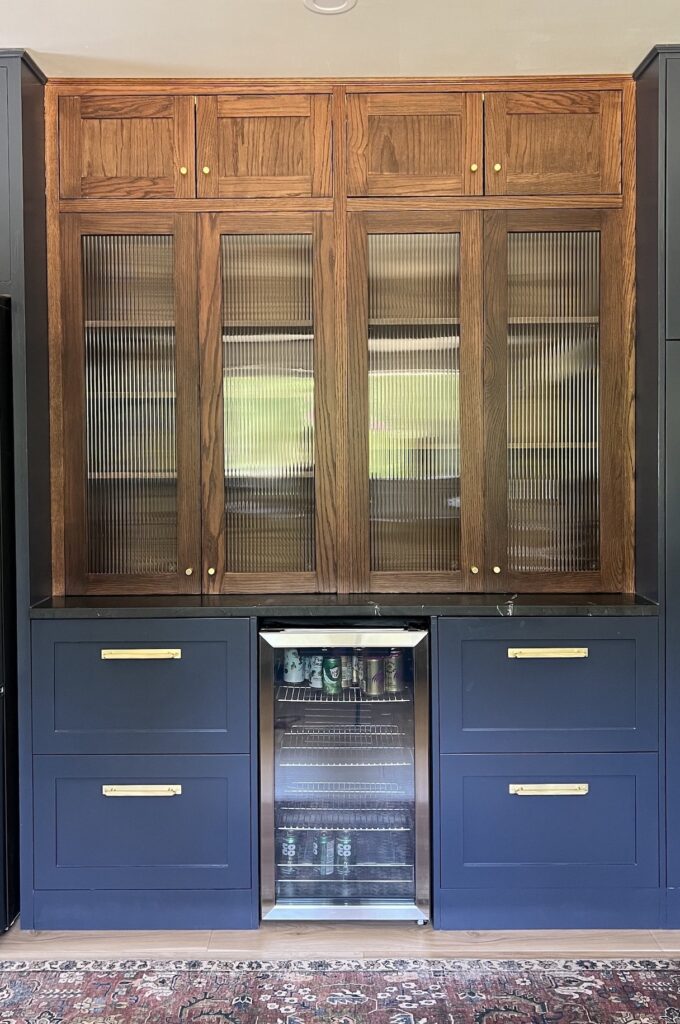
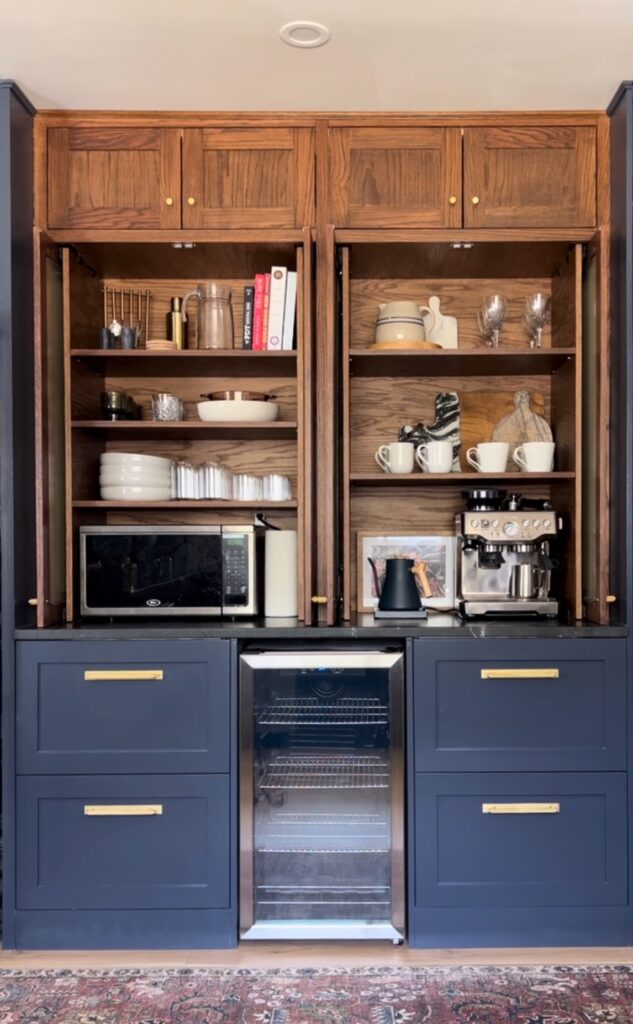
The Final Product
___________________________
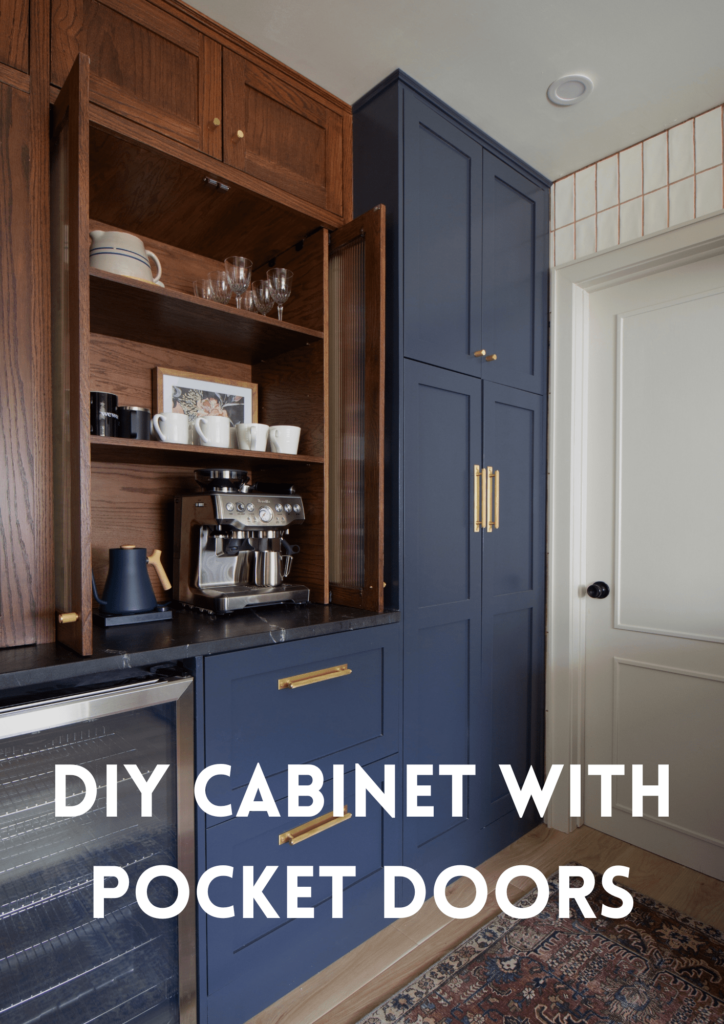
Building Lower Cabinets
The lower cabinet frames are built with a mix of regular 3/4″ plywood and red oak plywood (I used 1/4″ red oak plywood for the backing). Because the final design will show the inside of the cabinets through the glass cabinet fronts, we decided to use red oak plywood so that I can easily stain it.
I used a circular saw to cut the plywood down to size. I started with 4 pieces:
– the top (3/4″ red oak plywood)
– the sides (3/4″ regular plywood)
– the back (1/3″ red oak plywood)
For the top and back pieces, I used red oak because the wood would be visible (stains well – compared to other plywoods). The sides will not be visible in the finished product, so I used regular sanded plywood (it was cheaper). Of course you can use the same material for the entire piece if you choose.
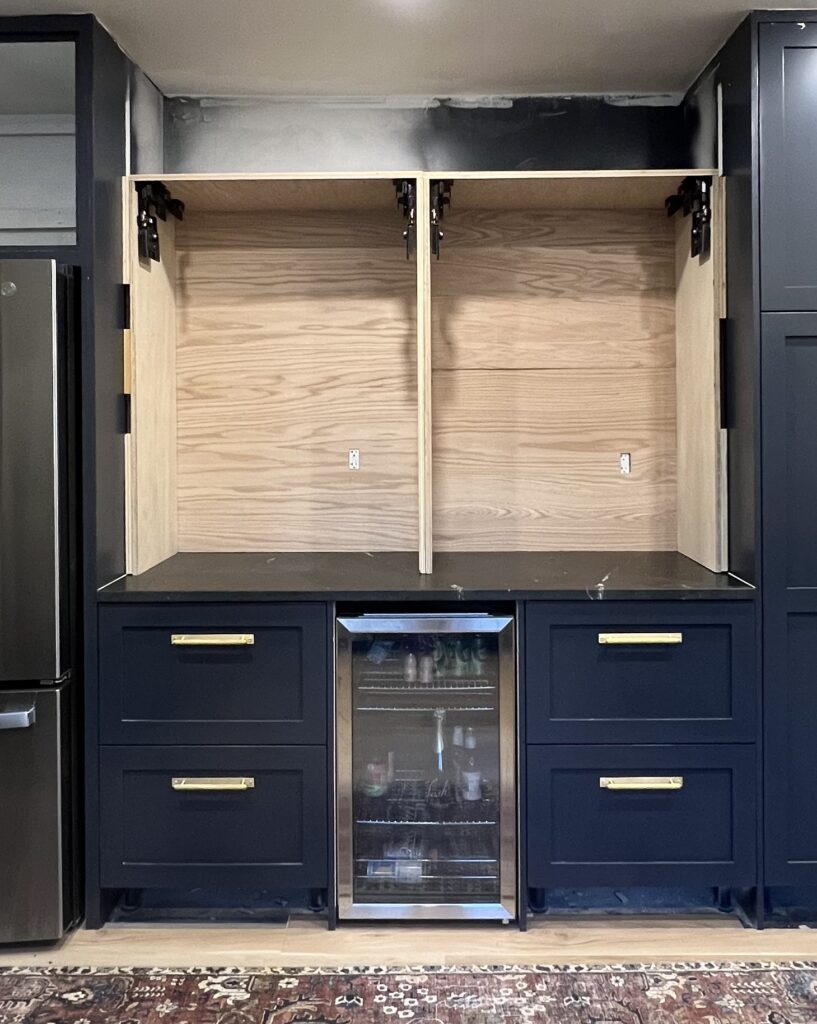
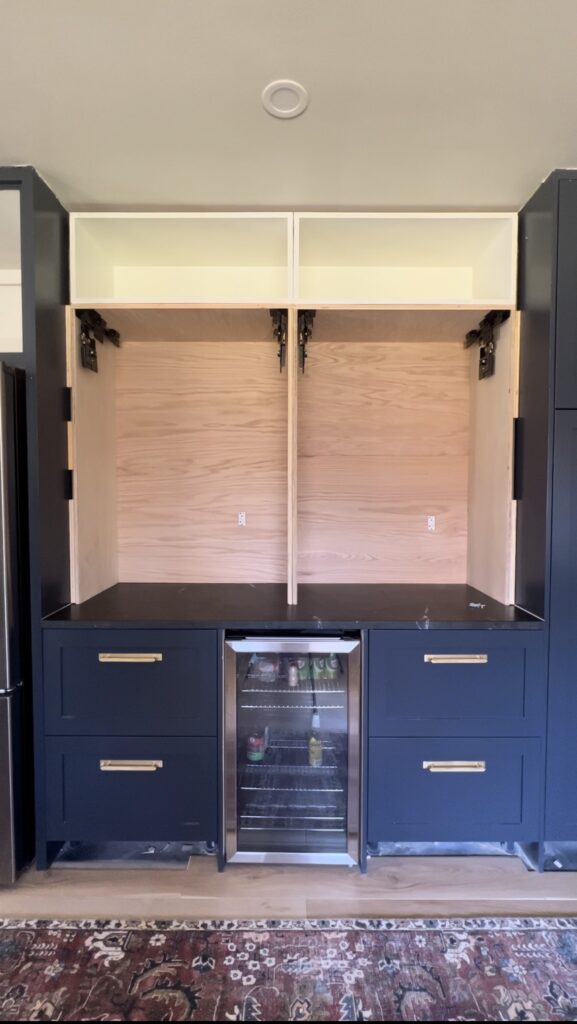
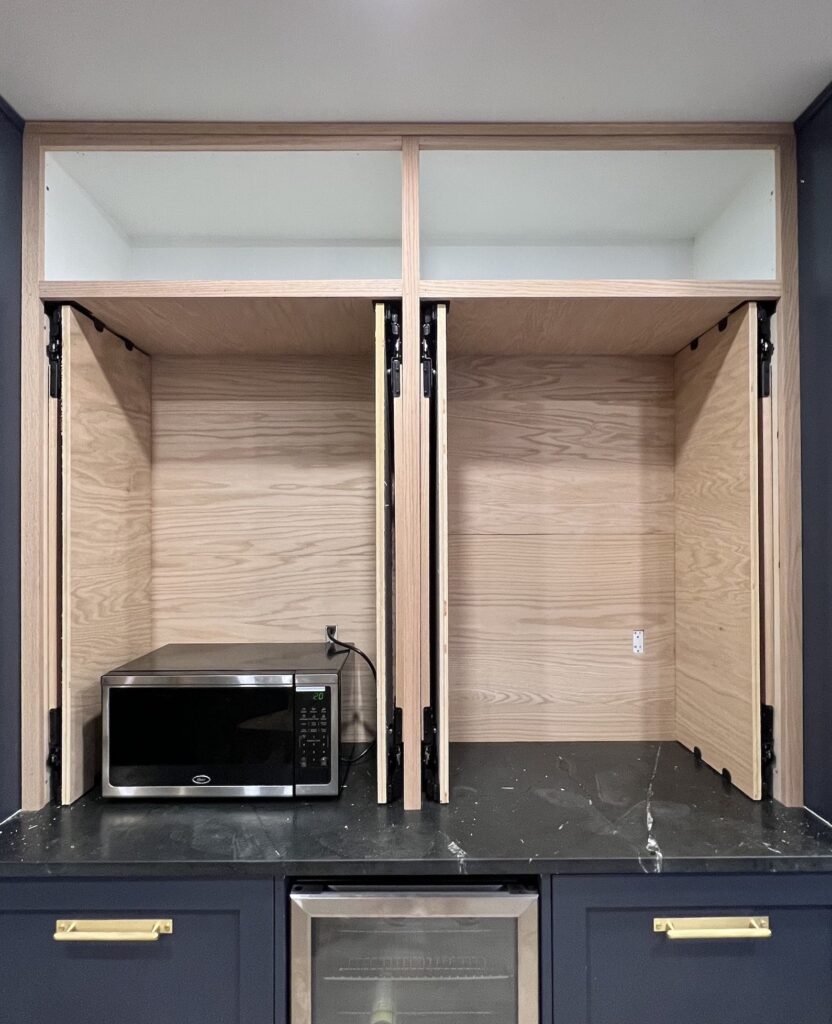
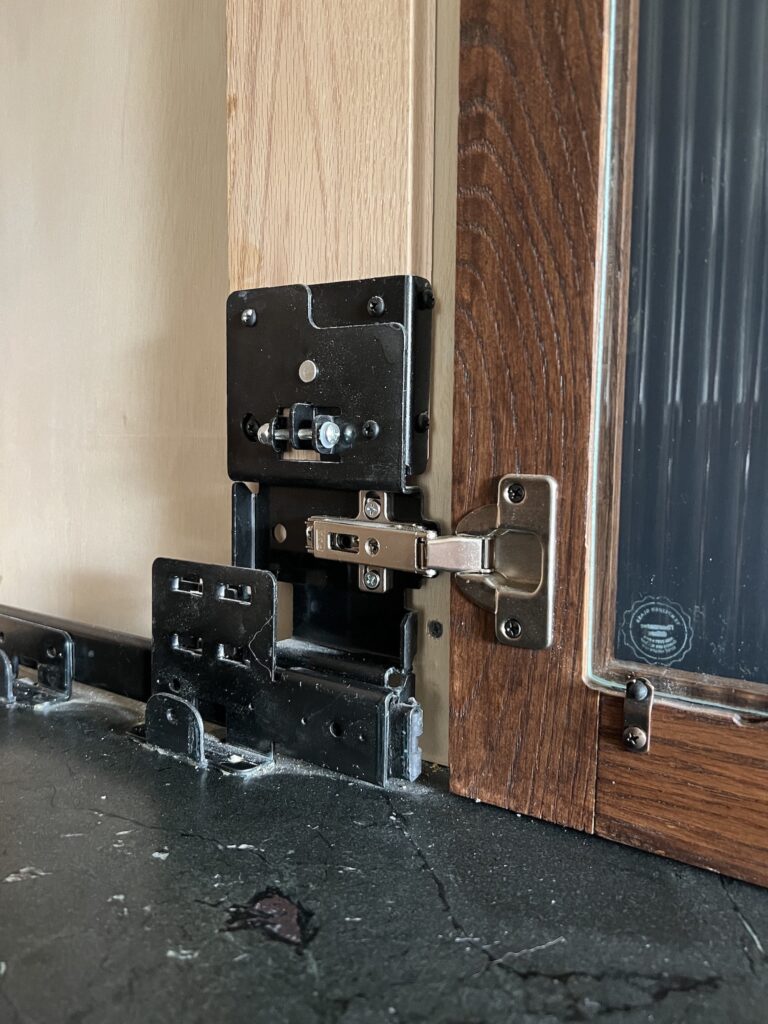
I assembled the top and sides together using some wood glue and screws, and then added the back with wood glue and brad nails. Next, I flipped the cabinet so that the top was on my work surface, and attached the pocket door hardware to the inside of the cabinet. Since these cabinets don’t have bottoms, I only attached the top sliders for now.
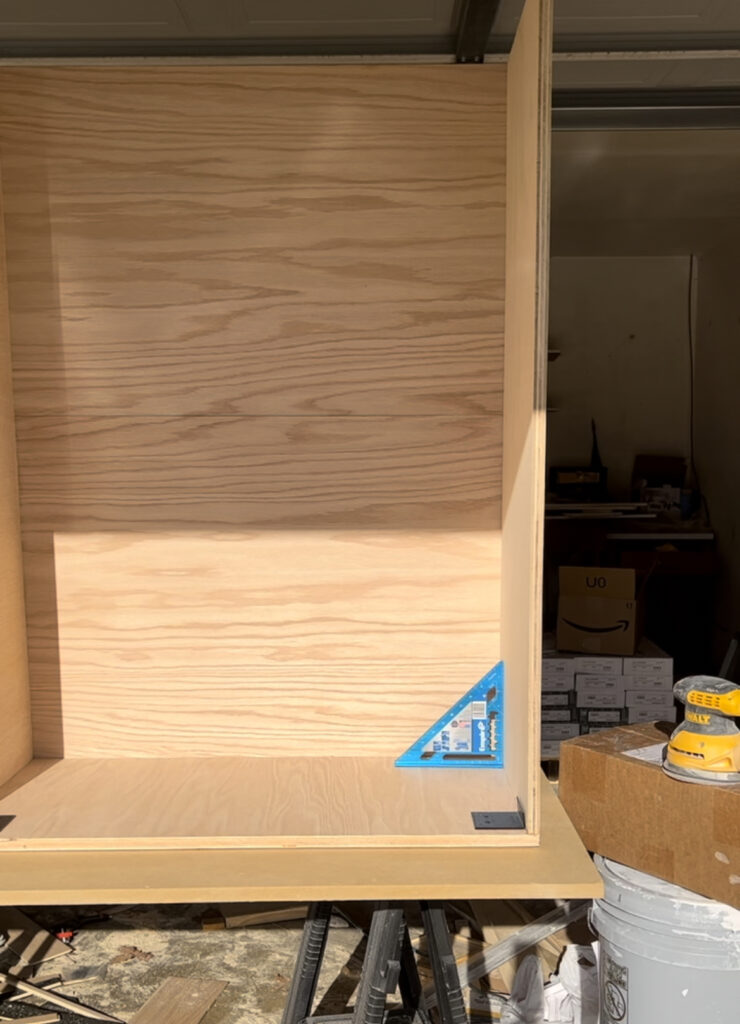
These come as a set for one cabinet door – since I have 4 doors, I purchased 4 sets. My cabinet depth is 15″ so I purchased the 14″ set. (These have almost doubled in price since I bought them back in 2021, here is a more affordable option from Rockler, it’s not exactly the same but functions the same way).
Here is how it looked with both lower cabinets in place. I added 3/4″ spacers at the end so that the vertical thickness is the same as the middle. As you can see the lower cabinets do not have a bottom, this is just a personal preference since I still wanted to be able to see our countertops!
___________________________
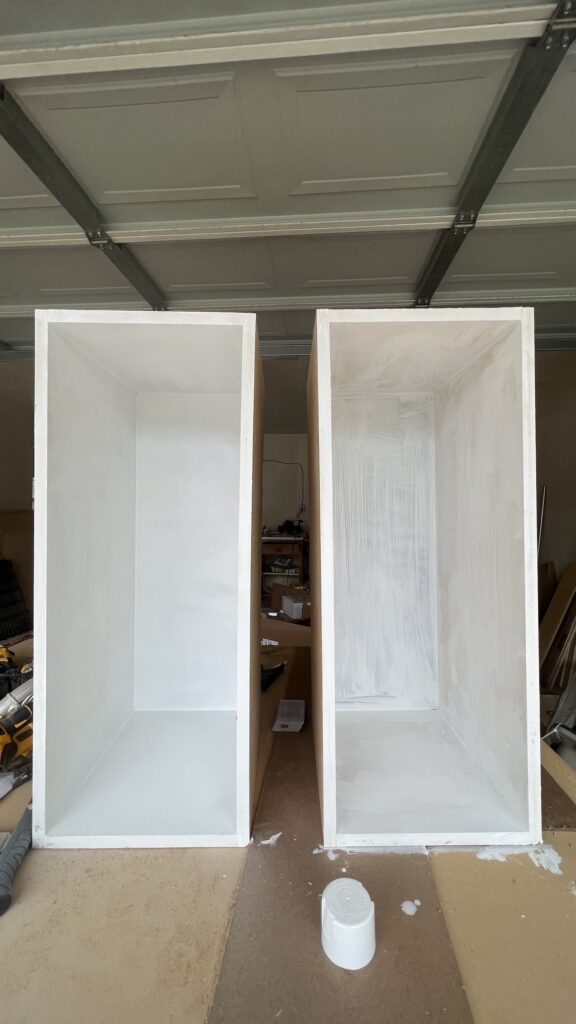
Building Upper Cabinets
Next I worked on the upper cabinets which were built with 3/4″ MDF and 1/4″ hardboard (for the back). I used MDF because I wanted to save on cost and I think I already had a sheet laying around. The upper cabinets are painted white to match all of our other kitchen cabinets. You won’t be able to see the white in the finished product. As for the paint, I used one coat of the Zinsser BIN Primer (this is a great primer for MDF), and two coats of whatever white paint I had in my garage.
___________________________
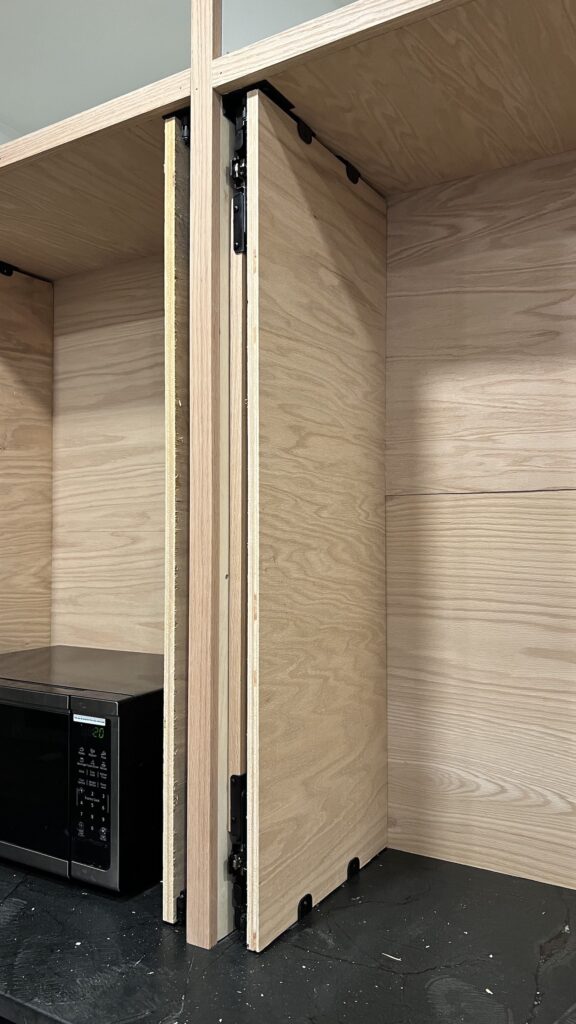
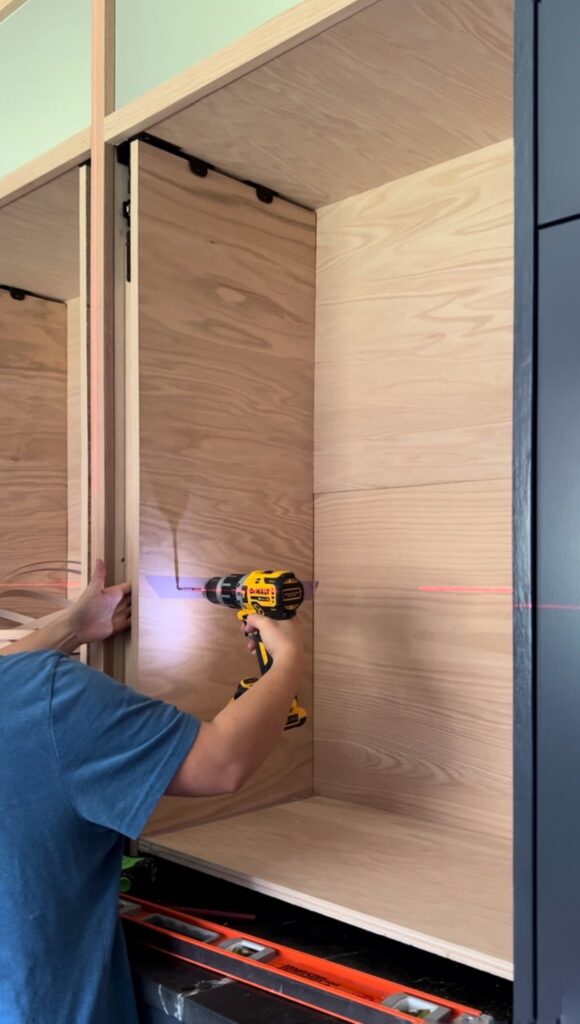
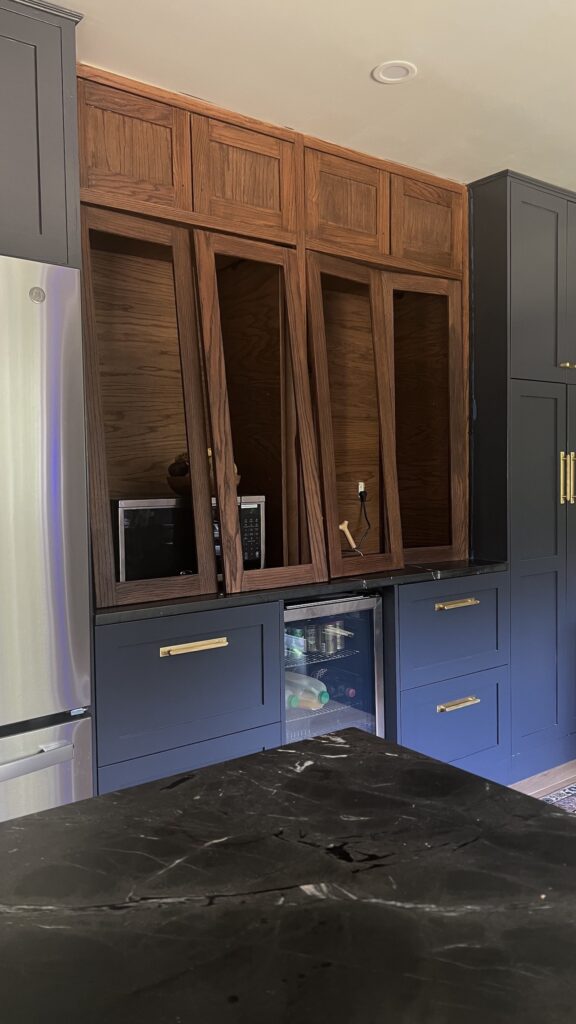
Adding Pocket Door Hardware
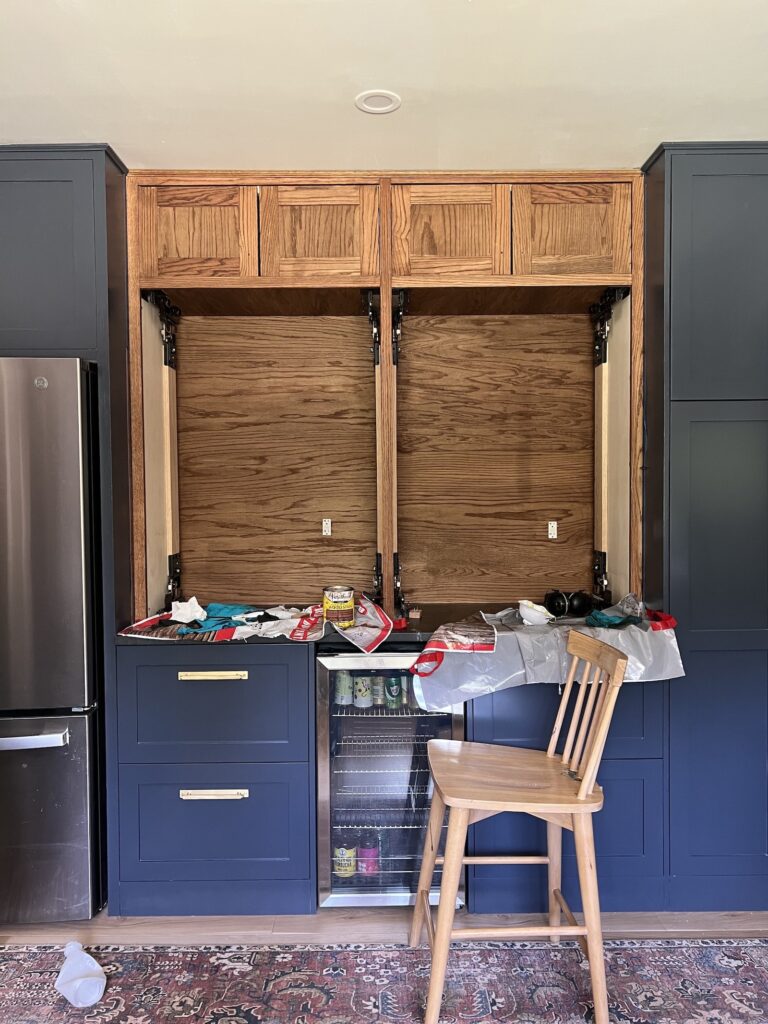
Once all the lower and upper cabinets were secured to each other was well as the adjacent cabinets, I started to finish adding the pocket door hardware.
Since the lower cabinets did not have a bottom, I didn’t have anything to screw the pocket door rollers to. I couldn’t drill it into the countertops (because I feel like I would ruin the countertop) so I brainstormed ways to adhere them. I ended up using heavy duty construction adhesive and used some weights to keep it in place. It worked quite well – just make sure the area the adhesive will touch is clear of debris.
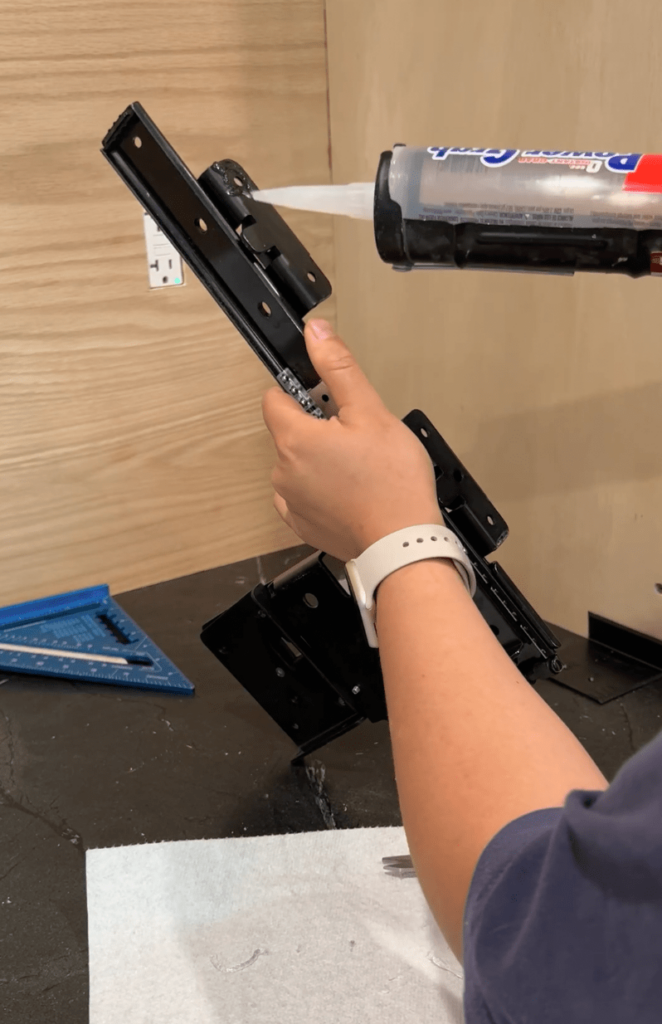
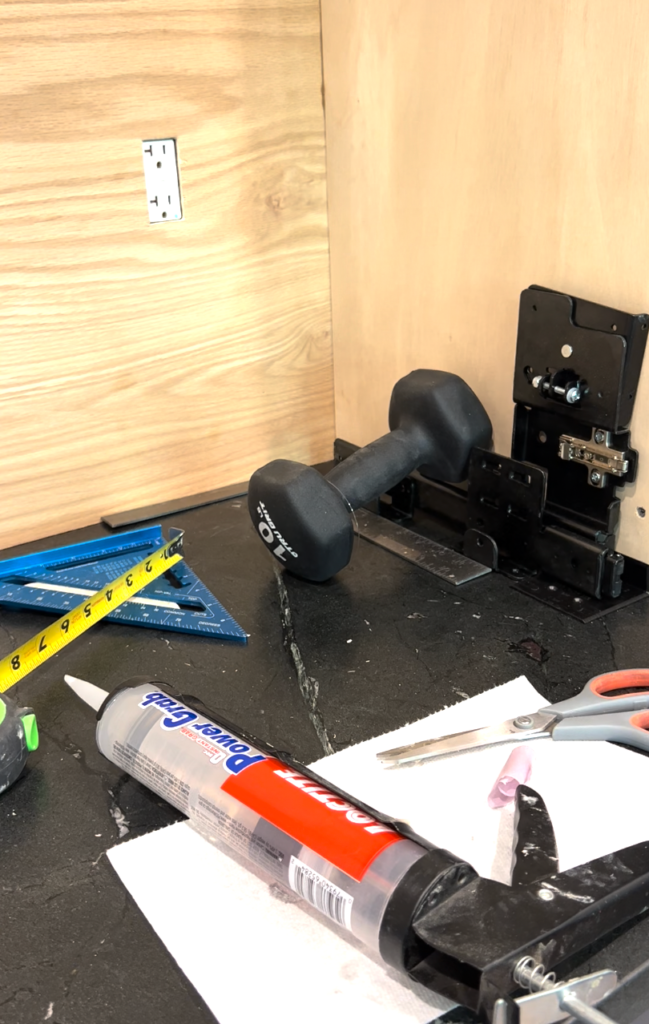
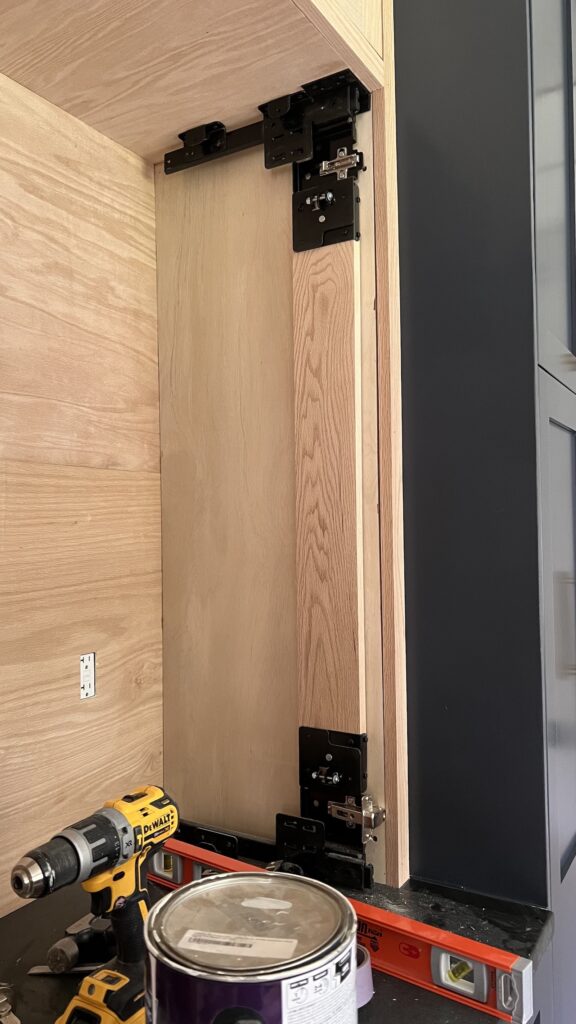
I waited two days for the adhesive to set (you only need 24 hrs) and then proceeded to connect the top and bottom slider. The board connecting the two sliders should be made of hardwood so I picked up some red oak 1×6 – and cut it down to 4″ (per the instructions). I attached the board to the sliders using screws that came with the hardware set. This will allow the sliders to move together when the cabinet door open and close.
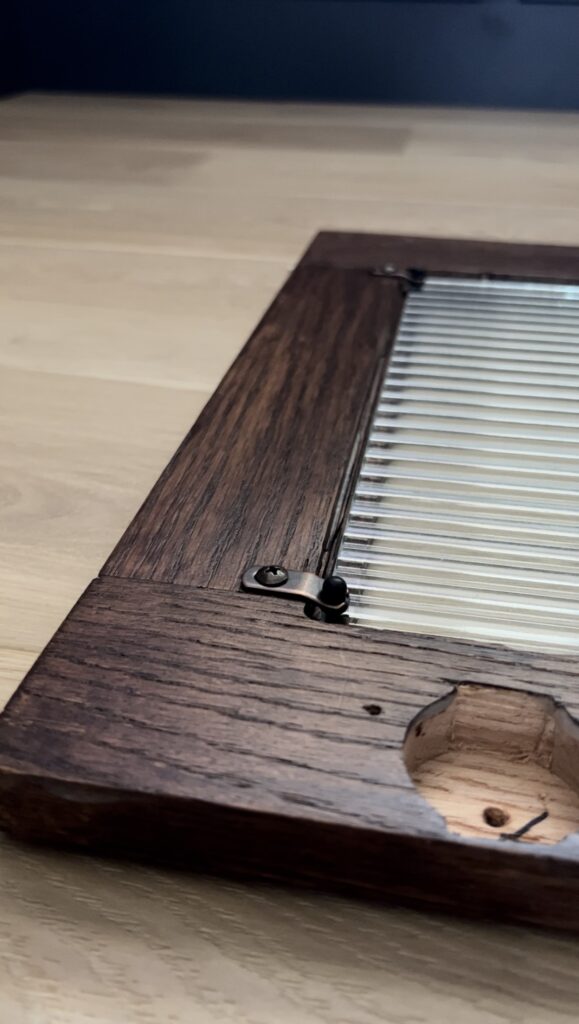
By now you might be thinking will all that hardware remain visible?! Don’t you worry, the hardware has a slot for another piece of wood to slide into, which will cover the hardware. The hardware then becomes “sandwiched” between the outer side panel and the inner side panel. For the inner panel, I used 3/4″ red oak plywood again so that all visible sides are the same wood species.
___________________________
Building the Face Frame
I used red oak 1×2 to cover all the of the edges. Adding the 3/4″ scrap wood around the perimeter previously allowed me to add the 1×2 with no problem. I attached the 1×2 with 1/2″ brad nails, and filled the holes with some wood glue. I also added a wood chair rail molding as the “crown” to cover the gap at near the ceiling.
___________________________
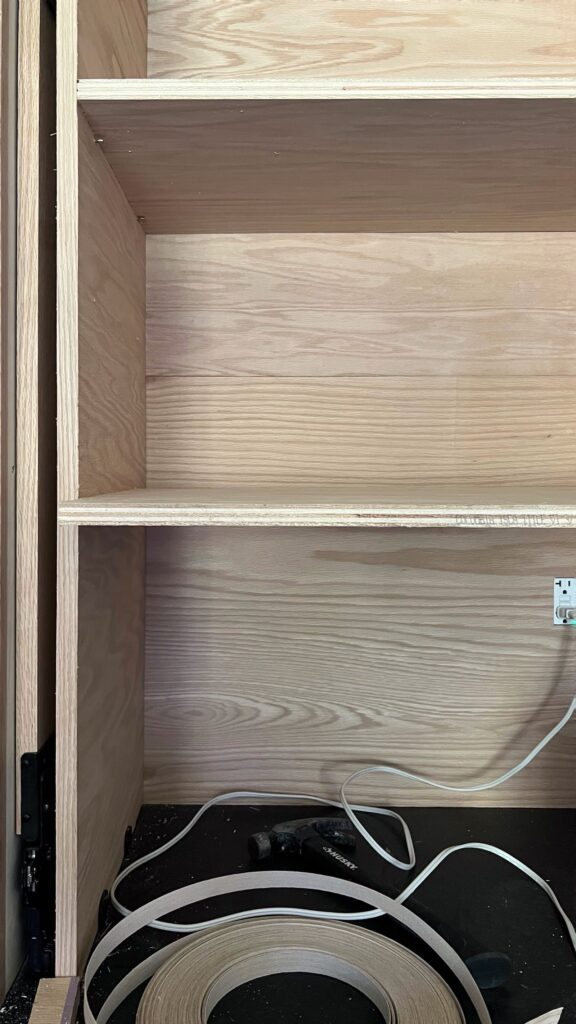
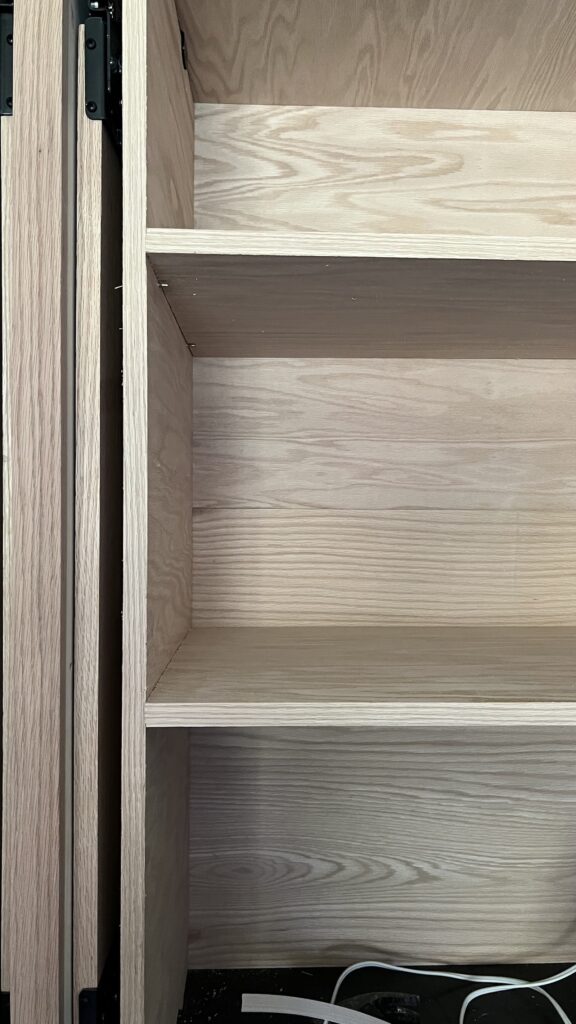
Adding Shelves
I drill some holes for the shelf pins and used a laser to make sure all the holes were level. Using more 3/4″ red oak plywood, I made a few shelves for the cabinet and finished off all the raw edges with some red oak edgebanding to make the shelves look like solid pieces of wood.
___________________________
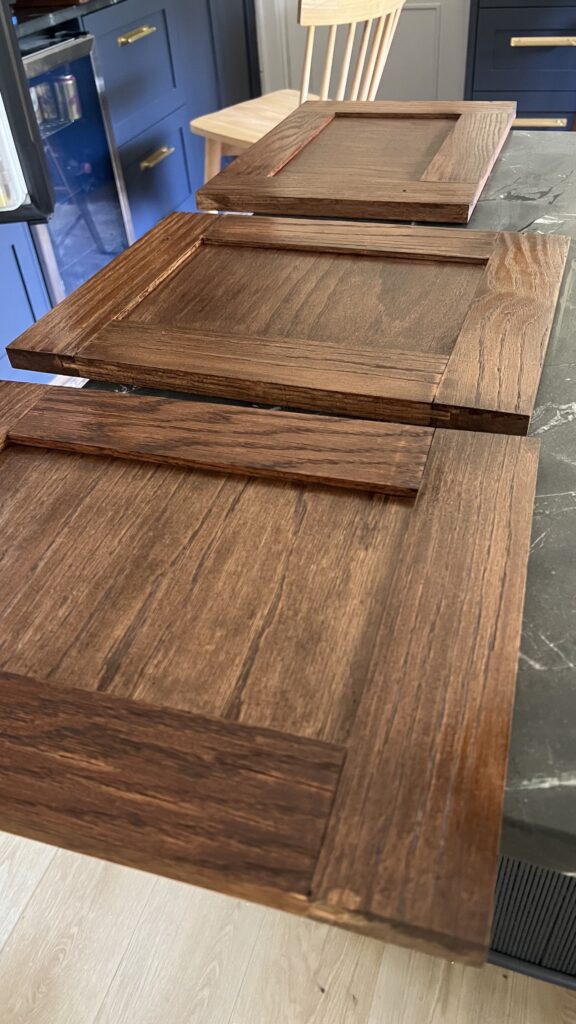
Making Cabinet Fronts
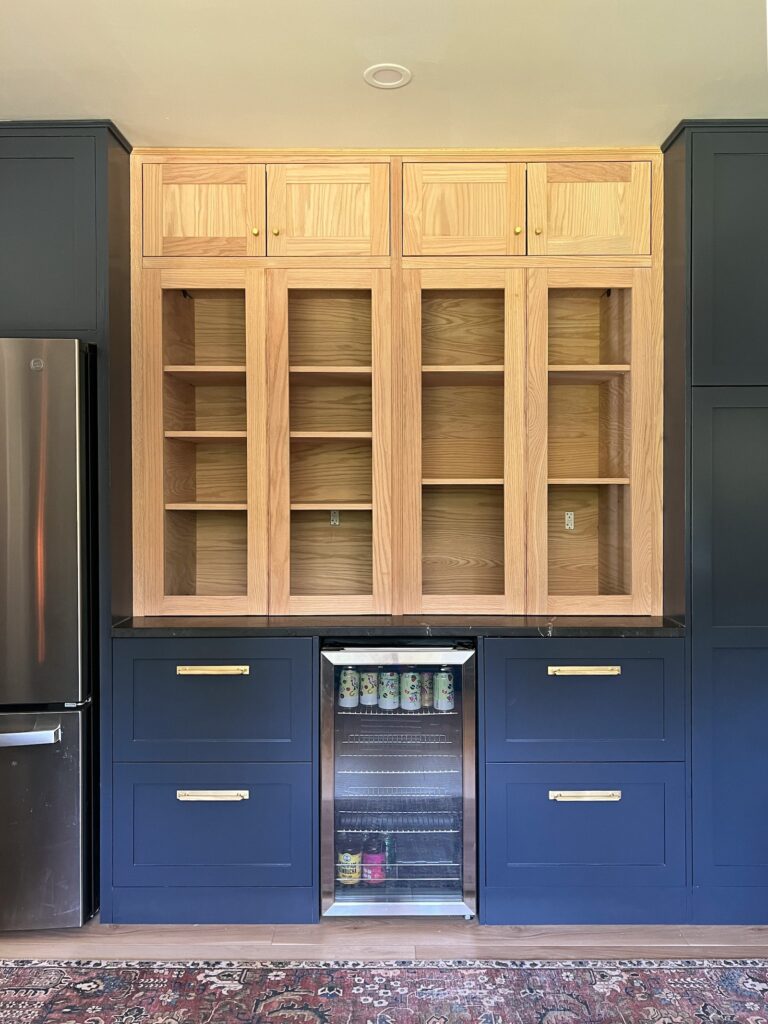
It took me quite some time to get started on this part of the project, mainly because I’ve never made these shaker style cabinet fronts before. For the upper cabinet fronts – I used red oak 1×3 for the “border” and a 1/4″ red oak plywood for the middle panel (left over scrap from building the frame in the first step). To learn how to make these fronts I recommend watching this video or reading this tutorial.
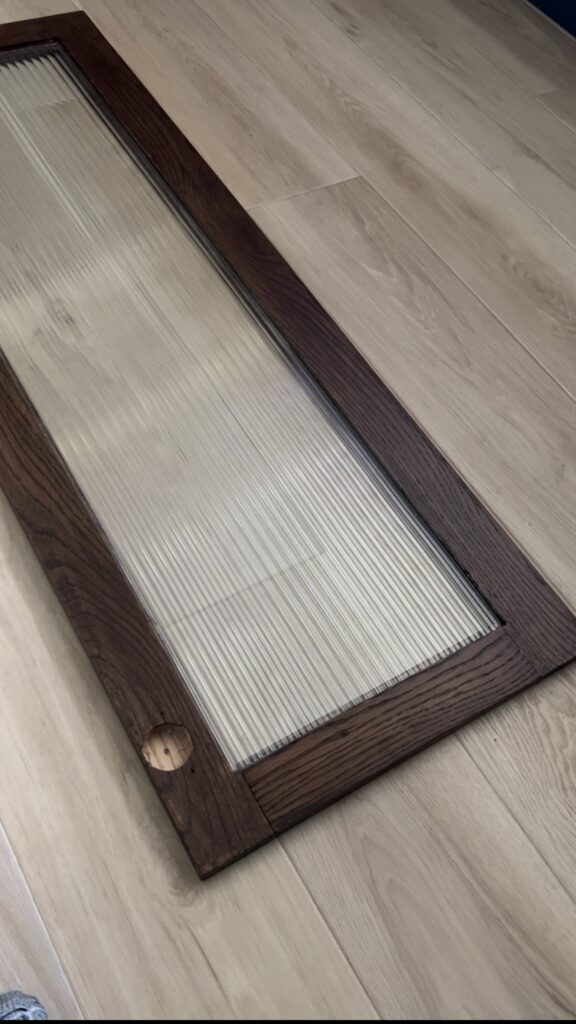
The lower cabinet fronts are made differently since there is no middle panel, instead it will be completed with a sheet of reeded glass. One method to making these types of doors is using pocket holes, but it will leave you will holes you’d need to plug. Another method is to use dowel joints, which I tried but found that it was difficult to keep straight. I took this opportunity to learn how to use a new tool – a biscuit joiner to make some biscuit joints! For a tutorial on how to make these, I recommend this view. (In the video, the woodworker is using dowel joints, I went with biscuits joints as mentioned previously).
___________________________
Applying Stain
I left the cabinet unstained for about two months because I couldn’t decide which stain I wanted to use. I’m indecisive! I ultimately ended going with English Chestnut by Varathane (an oil based stain) with a Matte Polyurethane by Varathane (water based) for the top coat.
When I first applied the stain, it felt too light and I realized I didn’t stir the can enough, all the dark pigment was at the bottom. So I did a second coat to achieve the color I wanted and left the stain on for 7 minutes before I wiped off the excess. I also applied two coats of the polyurethane as well. The matte finish is marvelous!!
___________________________
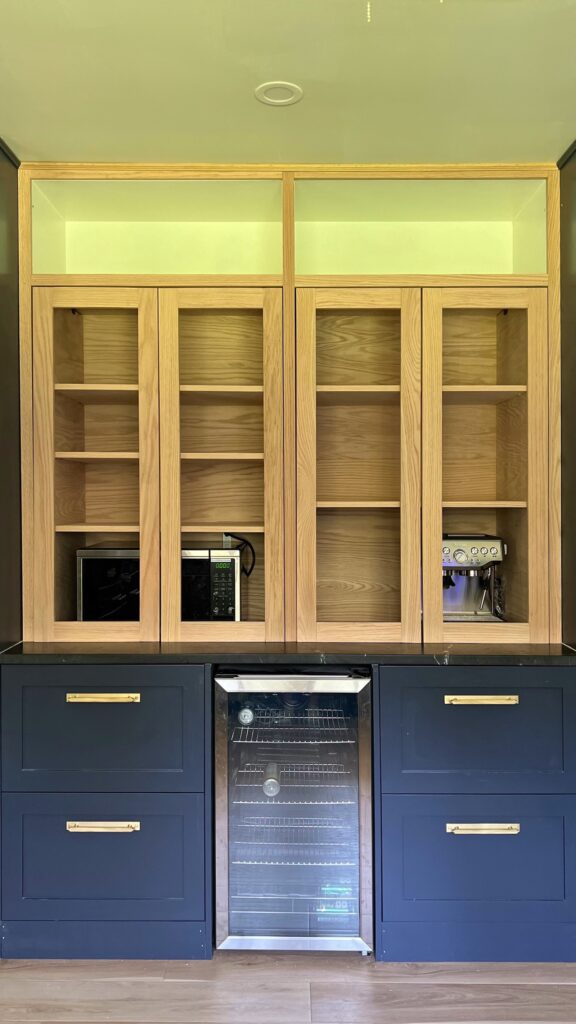
Adding Glass Inserts
I shopped around and got a few quotes for the reeded glass from local glass companies. The best quote I got was for $90/panel with free delivery! If you are ordering from a glass company be sure to clarify what dimension you prefer. The glass I used as 1/2″ reeds (is that the right term?)
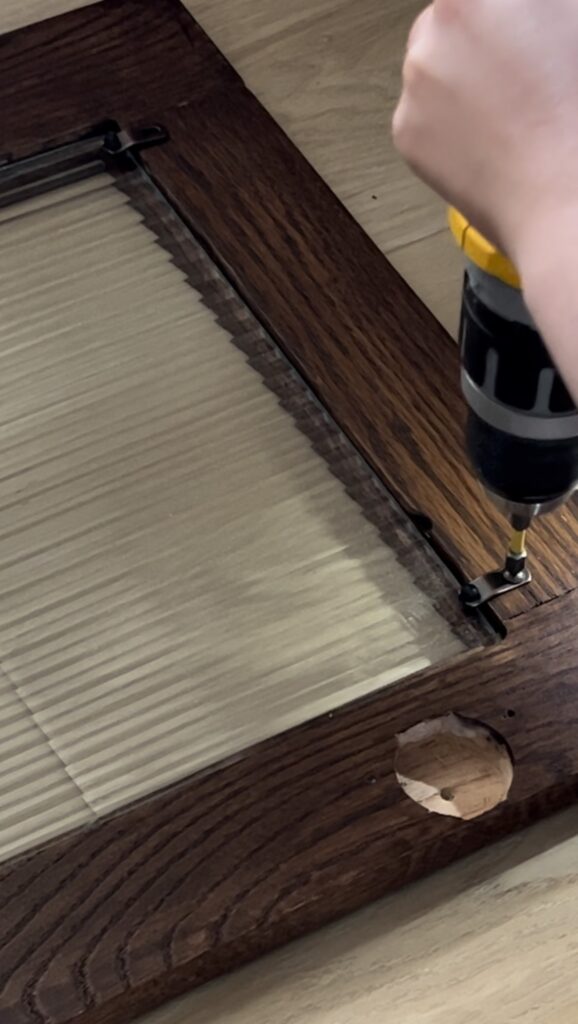
I used these glass retainer clips to keep the glass in place. I used 4 on each cabinet front.
___________________________
The Final Product
Once the glass is in, attach the cabinet pulls and handles, and install the hinges. The hinges come with the pocket door hardware set. The hinges should snap onto the pocket door hardware – they are so easy to install! Next insert the inner cabinet panel and secure it to the hardware using the provided screws. Add your shelving and move in your belongings!

There you have it, a DIY cabinet with pocket doors. And because this was my first big build, there were many “first” and mistakes along the way. I started this project in Feb 2022 and didn’t finish until July 2022 – 5 MONTHS! I like to say Masterpieces take time. 😉 One of the main reason it took so long was because I was so nervous about messing something up. I’m a perfectionist so to avoid making mistakes, I just avoided the project altogether and it would sit there for weeks without being touched.
You can check out some of my related Instagram content here, here, and here. I saved all the videos from this DIY cabinet with pocket doors on Instagram highlights as well – watch part 1 and part 2.
Materials & Tools Used
Materials
*Optional
- 3/4″ red oak plywood
- 1/4″ red oak plywood
- 3/4″ sanded plywood
- 3/4″ MDF
- 1/4″ hardboard
- 3/4″ red oak edgebanding
- 1×2 red oak board
- 1×3 red oak board
- 1×6 red oak board
- Pocket door hardware | Affordable pocket door hardware
- Wood Glue
- Glass retainer clips
- Zinsser BIN primer *
- White stain paint *
- Heavy duty construction adhesive *
- Brass shelf pins
Tools
- Circular Saw
- Miter Saw
- Power Drill
- Brad Nailer
- Biscuit Joiner
- Laser Level
Hope you found this lengthly tutorial helpful. Now go one and build your own DIY cabinet with pocket doors! Comment below if you have any additional questions!


Comments +